[Django] Project01 - form을 수정하고 bootstrap 적용하기
by Hoik Jang
앞서 만든 UserCreationForm, AuthenticationForm은 User 모델의 인스턴스를 생성할 때, 이를 이용해 로그인을 할 때 필요한 Django 내부에 구현된 클래스이다.
이들을 이용하면 편리하게 회원가입, 로그인 페이지를 구현할 수 있지만 보기에 예쁘지는 않다.(굉장히 주관적이다..)
그래서 이를 수정하여 아주 심플하게 보이면서, bootstrap을 적용하여 조금 예쁘게 만들어볼 것이다.
1. django-bootstrap4 설치
shell command에 아래의 명령어를 입력하여 django-bootstrap4를 설치한다.
pip install django-bootstrap4
instagram 프로젝트 폴더의 settings.py에 위에서 설치한 패키지를 추가한다.
# settings.py
...
INSTALLED_APPS = [
	'bootstrap4',
	...
]
2. base.html 만들기
이 과정이 필수는 아닐 수 있겠으나,
모든 template(html)에 적용되는 내용을 각각의 html 파일마다 쓰는 것은 매우 비효율적이다.
그래서 공통으로 쓰이게 될 템플릿을 하나 작성하고 다른 템플릿들은 이를 상속받아 내용을 추가하는 방식으로 진행할 것이다.
우선, instagram 프로젝트 폴더에 templates 폴더를 만든다.
이 폴더 안에 base.html 파일을 만들고 내용을 작성한다.
<!-- base.html -->
<!DOCTYPE html>
<html lang="en">
<head>
    <meta charset="UTF-8">
    <meta name="viewport" content="width=device-width, initial-scale=1.0">
    <meta http-equiv="X-UA-Compatible" content="ie=edge">
    <title>Document</title>

    <!-- bootstrap -->
    <link rel="stylesheet" href="https://stackpath.bootstrapcdn.com/bootstrap/4.3.1/css/bootstrap.min.css" integrity="sha384-ggOyR0iXCbMQv3Xipma34MD+dH/1fQ784/j6cY/iJTQUOhcWr7x9JvoRxT2MZw1T" crossorigin="anonymous">
</head>
<body>
    <div class="container">
    {% block body %}
    <!-- 다른 템플릿에서 이 템플릿을 상속받아 사용할 때 이 위치에 코드들이 적용된다. -->
    {% endblock %}
    </div>
    <!-- bootstrap -->
    <script src="https://code.jquery.com/jquery-3.3.1.slim.min.js" integrity="sha384-q8i/X+965DzO0rT7abK41JStQIAqVgRVzpbzo5smXKp4YfRvH+8abtTE1Pi6jizo" crossorigin="anonymous"></script>
    <script src="https://cdnjs.cloudflare.com/ajax/libs/popper.js/1.14.7/umd/popper.min.js" integrity="sha384-UO2eT0CpHqdSJQ6hJty5KVphtPhzWj9WO1clHTMGa3JDZwrnQq4sF86dIHNDz0W1" crossorigin="anonymous"></script>
    <script src="https://stackpath.bootstrapcdn.com/bootstrap/4.3.1/js/bootstrap.min.js" integrity="sha384-JjSmVgyd0p3pXB1rRibZUAYoIIy6OrQ6VrjIEaFf/nJGzIxFDsf4x0xIM+B07jRM" crossorigin="anonymous"></script>
</body>
</html>
여기서 bootstrap CDN을 넣어야 bootstrap을 사용할 수 있다.
나는 여기에 Navbar도 만들었지만 코드가 너무 길어져서 생략했다..
이제 settings.py의 TEMPLATES 부분을 수정한다.
# settings.py
...
TEMPLATES = [
    ...
    'DIRS': [os.path.join(BASE_DIR, 'instagram', 'templates')],
    ...
]
os.path.join() 메소드는 안에 들어간 인자를 합쳐 경로를 만들어주는 것이다. 위와 같이 작성하면 <BASE_DIR>/instagram/templates라는 경로가 만들어지는데 운영체제에 따라 디렉토리를 구분하는 글자가 /일 수도 있고 \ 일 수도 있기 때문에 운영체제에 구애받지 않기 위해 os.path.join() 메소드를 사용한다.
3. form.html 수정
이제 accounts 앱 내의 templates/accounts/form.html 파일을 수정한다.
<!-- form.html -->
{% extends 'base.html' %}
{% load bootstrap4 %}

{% block body %}
    <h1 class="text-center">
        {% if "signup" in request.path %}
        회원가입
        {% else %}
        로그인
        {% endif %}
    </h1>

    <form method="POST">
        {% csrf_token %}
        {% bootstrap_form form %}
        <button type="submit" class="btn btn-primary">가입</button>
    </form>
{% endblock %}
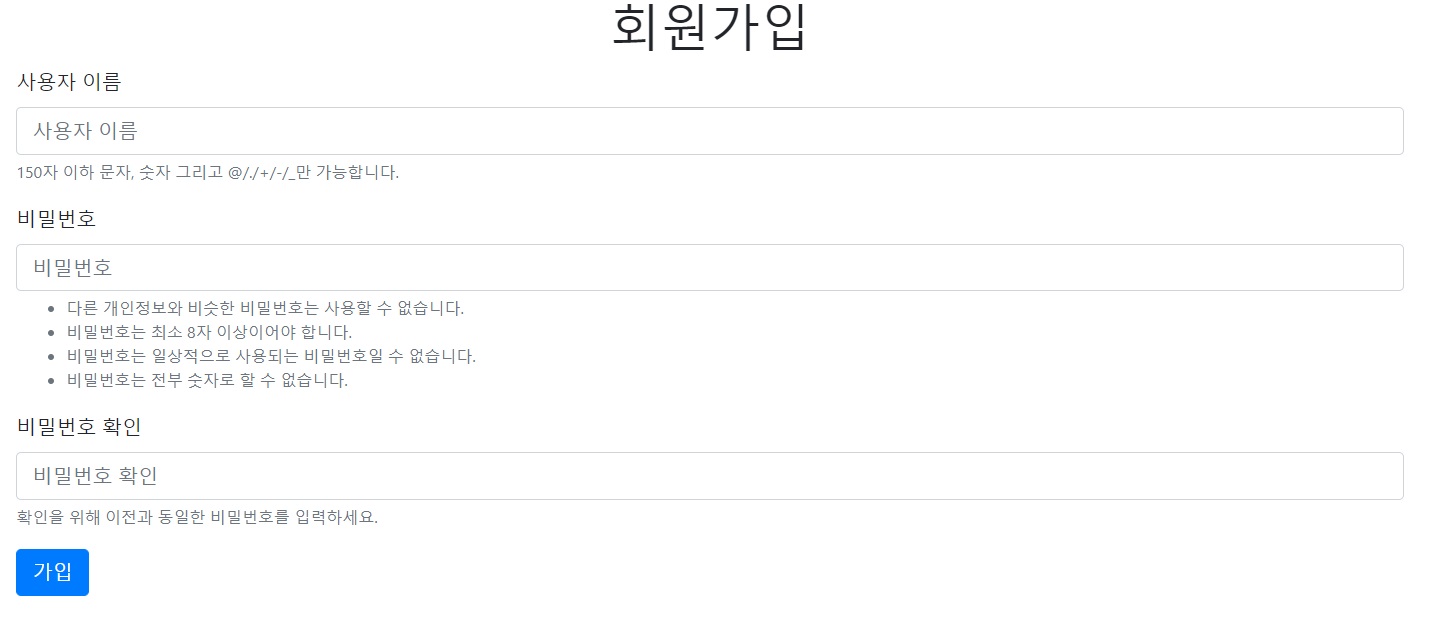
이제 회원가입 페이지를 열어보면 bootstrap이 적용된 것을 확인할 수 있다.

4. forms.py 생성
Django가 제공하는 회원가입 폼은 위의 이미지처럼 너무 설명이 많다..
그래서 위에서 사용했던 UserCreationForm을 상속받아 조금만 가공하여 깔끔하게 만들어보자.
accounts 앱 내에 forms.py 파일을 생성하고 내용을 작성한다.
# forms.py
from django.contrib.auth.forms import UserCreationForm
from django.contrib.auth import get_user_model
from django import forms

class CustomUserCreationForm(UserCreationForm):
    # UserCreationForm을 상속받아 CustomUserCreationForm을 만든다.
    username = forms.CharField(
        label="",
        widget=forms.TextInput(attrs={
            "placeholder": "사용자 이름",
        })
    )
    password1 = forms.CharField(
        label="",
        widget=forms.PasswordInput(attrs={
            "placeholder": "비밀번호(8자 이상)",
        })
    )
    password2 = forms.CharField(
        label="",
        widget=forms.PasswordInput(attrs={
            "placeholder": "비밀번호 확인",
        })
    )
    class Meta:
        model = get_user_model() # 이 폼이 적용될 모델을 지정한다.
        fields = ['username', 'password1', 'password2',]
        # 이 폼에서 입력 받을 필드명을 지정한다.
5. views.py 수정
위에서 만든 CustomUserCreationForm을 적용하기 위해 accounts 앱 내의 views.py를 수정한다.
# views.py
...
from .forms import CustomUserCreationForm

def signup(request):
    if request.method == 'POST':
        form = CustomUserCreationForm(request.POST)
        ...
    else:
        form = CustomUserCreationForm()
        ...
이제 다시 회원가입 페이지를 열어보면 매우 심플해진 것을 확인할 수 있다.

